Most people underestimate how much waste a home project actually produces. You clear out a room, fill a few bin bags, and think you’re nearly done. Then you get to the old carpet underneath, the broken shelving unit in the loft, and the pile of garden waste you forgot about entirely. Suddenly what looked manageable turns into a full afternoon of loading a van, or worse, several trips to the tip that eat up your whole weekend.
Getting the waste estimate right before you book anything saves you from two common problems. Either you order something too small and end up with rubbish piled around it, or you pay for space you never fill. Neither is ideal, and both are avoidable with a bit of planning. It’s usually worth checking what skip hire in your area actually offers in terms of sizes before you settle on one, since matching your estimate to a real range makes the whole decision much easier.
Why People Get This Wrong So Often
The main issue is that waste doesn’t look like much when it’s still attached to the house. A kitchen full of cabinets looks like a kitchen, not a pile of debris. It’s only once everything is ripped out and sitting on the floor that you realise how much space it actually takes up.
Thinking in Weight Instead of Volume
There’s also a tendency to think in terms of weight rather than volume. People picture “a few bags of rubble” and forget that old furniture, broken tiles, and packaging from new materials all take up far more room than they weigh. A single old sofa can eat up more space in a container than a stack of bricks twice its weight.
Waste Builds Up Gradually
Then there’s the timing problem. Waste tends to build up gradually over a project rather than arriving all at once, so it’s easy to lose track of the total until it’s sitting in front of you.
Break the Project Into Stages
Rather than trying to guess a total figure straight away, it helps to think through the project stage by stage. What comes out during demolition. What gets left over from fitting new materials. What’s left standing at the end that needs clearing.
A Bathroom Refit Example
A bathroom refit is a good example. Demolition alone produces the old bath or shower, tiles, sanitaryware, and whatever flooring is underneath. Then there’s offcuts from new tiling, packaging from fittings, and maybe some leftover plasterboard if a wall was patched up. Add those together and it’s noticeably more than most people expect walking in.
Doing this room by room, or task by task, gives a much more realistic picture than trying to estimate the whole job in one go. It also helps you spot which stage is going to produce the bulk of the waste, which matters if you’re planning delivery and collection dates.
Matching the Estimate to a Skip Size
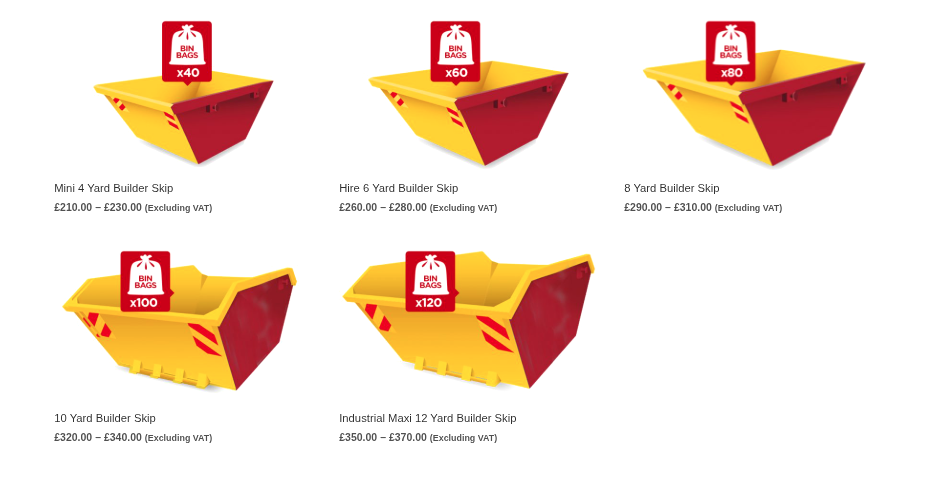
Once you’ve got a rough sense of volume, the next step is matching that to an actual size. This is where a lot of people either play it too safe or cut corners to save money.
Going Too Small
Going too small feels like the cheaper option upfront, but it rarely works out that way. If a skip fills up before the job is done, you’re either paying for an early swap or storing extra rubbish somewhere it shouldn’t be sitting. Neither looks great if it’s on a driveway or spilling onto a pavement.
Going Too Large
Going oversized isn’t a disaster, but it does mean paying for capacity you’ll never use. If you’re on a tight renovation budget, that’s money that could have gone elsewhere.
A Rough Rule of Thumb
A reasonable rule of thumb is to think about what’s leaving the property rather than how big the property is. A single room clearance, like an old bedroom or a small kitchen, usually needs less space than people assume. A full renovation involving multiple rooms, structural changes, or a garden clearance on top of building waste tends to need considerably more, sometimes enough that a mid to large size makes more sense from the outset.
If you’re genuinely stuck between two sizes, going with the slightly larger option is usually the safer call. It’s a smaller cost difference than arranging a second delivery partway through a job.
Don’t Forget What You Can’t Put In
This is a detail that trips people up regularly. Not everything can go into a general skip, and finding this out halfway through loading it isn’t a great moment. A few items usually need separate arrangements, either because of local regulations or because of how they need to be processed afterwards:
- Fridges and freezers
- Mattresses
- Paint tins and other liquids
- Certain electrical items
- Gas canisters or anything pressurised
- Asbestos or asbestos-containing materials
If your project involves clearing out an old kitchen with appliances, or a garage full of odds and ends built up over years, it’s worth checking what’s included and what isn’t before the container arrives. It changes how much space you actually have for the waste that is allowed, and it avoids an awkward situation where something has to be pulled back out.
A Quick Gut Check Before You Book
Before finalising anything, it helps to walk through the property one more time and picture it empty of whatever’s being removed. Look at what’s actually there, not what you remember being there when you started planning. People are often surprised by how much has accumulated once they look properly, especially in lofts, sheds, or rooms that have been used for storage rather than living.
If in doubt, describing the project honestly to whoever you’re arranging things through tends to get you a more accurate recommendation than trying to work it out entirely on your own. They’ve usually seen enough similar jobs to know roughly what size fits what scope of work.
Getting It Right the First Time
None of this needs to be complicated. Break the job into stages, think in terms of volume rather than weight, check what can and can’t go in, and be honest about how much has actually built up. Do that, and choosing the right size becomes far less of a guessing game and far more of a straightforward decision.