Every skier knows the feeling—you just carved through untouched powder, nailed a jump, or experienced a breathtaking panoramic view, and you wish you could relive that moment forever. For years, capturing those epic runs meant strapping bulky action cameras to helmets, fumbling with mounts in freezing temperatures, and dealing with tangled accessories that disrupted the flow of a perfect ski day. Those days are over. Modern 4K camera ski goggles have revolutionized how we document our mountain adventures, embedding ultra-high-definition cameras directly into the eyewear you’re already using. But owning these goggles is only half the equation. The real magic happens when you can wirelessly transfer that stunning footage to your smartphone between runs—reviewing clips on the chairlift, sharing highlights with friends in real time, and freeing up storage for your next descent. This guide walks you through the entire process of connecting your camera-equipped ski goggles to your phone via Wi-Fi, from initial setup to flawless video transfer, ensuring nothing stands between you and sharing your best moments on the mountain.
Understanding Your 4K Camera Ski Goggles
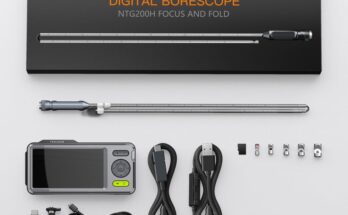
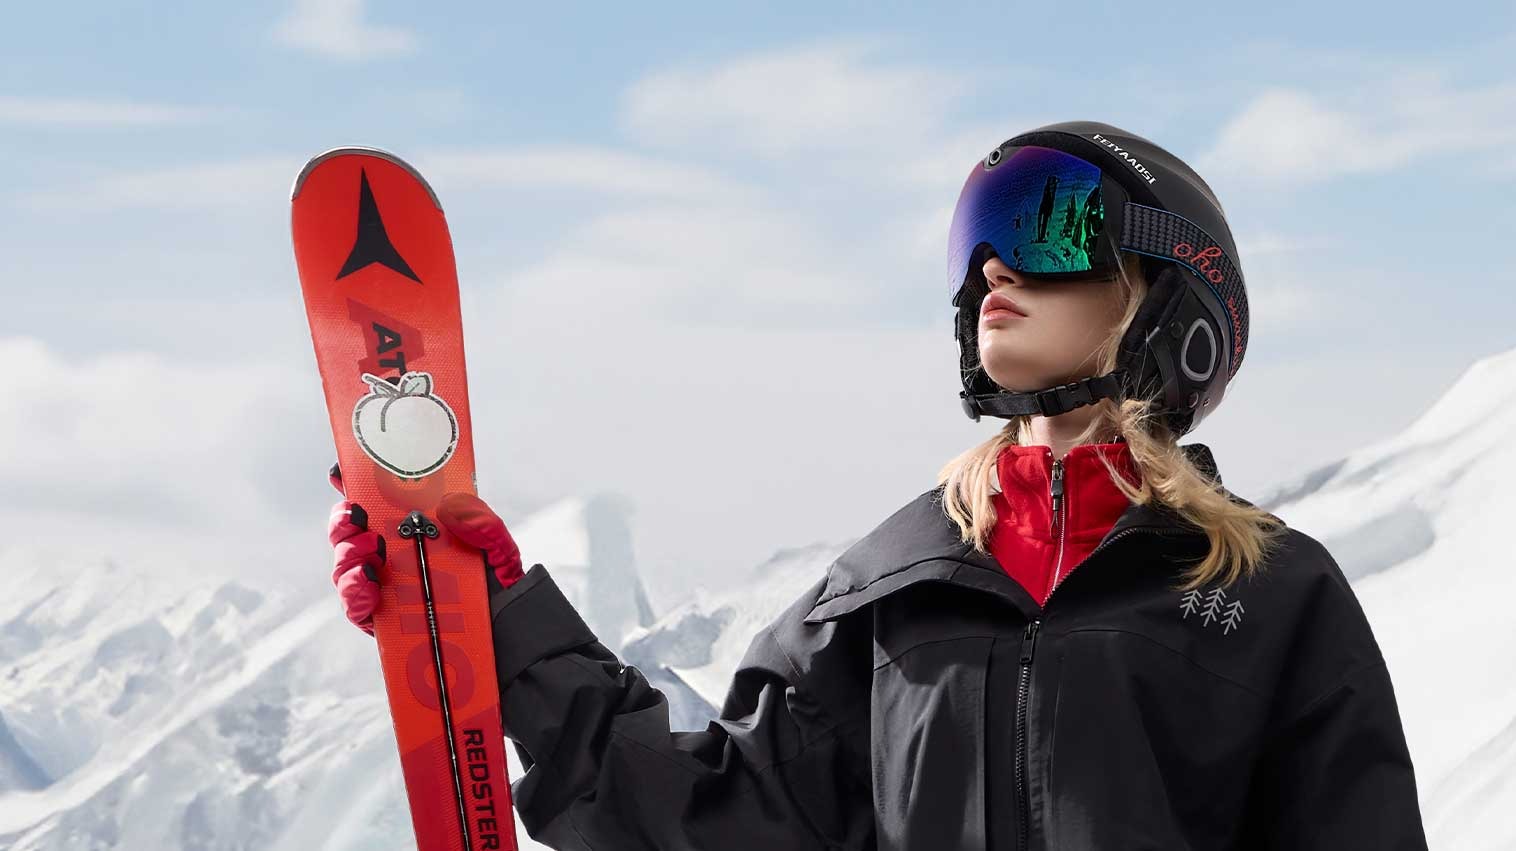
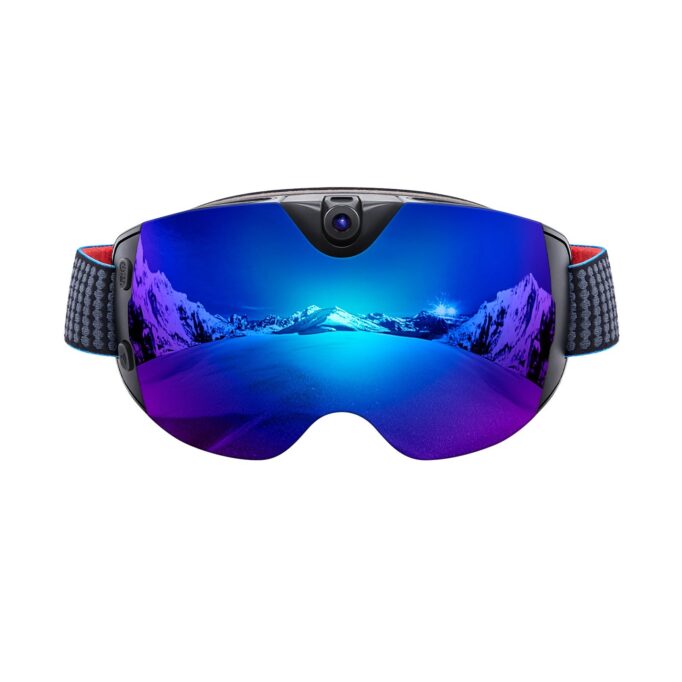
At their core, camera ski goggles combine premium eye protection with an integrated ultra-high-definition 4K camera positioned just above the bridge of the nose, capturing footage from your natural line of sight. This means every turn, every spray of powder, and every sweeping mountain vista gets recorded exactly as you experienced it—no awkward helmet angles or chest-mount distortion. Built into the frame is a Wi-Fi module that creates a private wireless network, allowing your smartphone to communicate directly with the goggles without needing cell service or a nearby router. Companion apps, developed by each manufacturer, serve as your command center for controlling the camera, previewing shots, and managing file transfers.

Different models offer varying control interfaces. Some rely on tactile buttons along the goggle frame that you can locate even with thick gloves, while others incorporate voice commands so you can start or stop recording hands-free mid-run. Brands like Ohosunshine and other eyewear specialists have pushed the integration of optics and technology further, ensuring that camera functionality doesn’t compromise the primary job of protecting your eyes on the mountain. The typical workflow is straightforward: you record during your descent, pause at the bottom or on the chairlift, wirelessly pull selected clips to your phone, and share or edit them before your next run. This cycle of record, transfer, and share keeps your momentum going all day without ever removing your goggles or pulling out a separate camera. Understanding this ecosystem is the first step toward making it work effortlessly for you.
Preparing Your Goggles and Smartphone for Success
The difference between a frustrating first attempt and a seamless experience comes down to what you do before you ever reach the mountain. A few minutes of preparation at home—where your hands are warm and your patience is intact—saves enormous headaches when you’re standing in the cold wanting to transfer footage.
Step 1: Pre-Ski Day Checklist
The night before your ski day, plug in your goggles and charge them to full capacity. Most camera goggles offer between two and four hours of recording time, but Wi-Fi transfer draws significant power, so starting at 100% is non-negotiable. Do the same for your smartphone. Next, download or update the manufacturer’s companion app—whether that’s from the App Store or Google Play. Developers frequently push firmware updates through these apps that fix connectivity bugs and improve transfer stability, so running an outdated version is asking for trouble. Finally, check your phone’s available storage. A single minute of 4K footage can consume 350 to 500 megabytes, meaning a full day of skiing could generate tens of gigabytes. Delete old files, offload photos to the cloud, or insert a larger microSD card if your phone supports it. Walking onto the mountain with a full phone guarantees missed opportunities.
Step 2: Familiarizing Yourself with Goggle Controls
Put the goggles on at home and locate every button by touch alone—you’ll be wearing thick gloves on the mountain. Typically, you’ll find a power button on one side of the frame, a record toggle on the other, and a dedicated Wi-Fi activation button or a combination press that enables wireless mode. Press each one and pay attention to the feedback: most goggles use colored LED indicators visible at the edge of your peripheral vision or emit short audio tones. A solid green light might indicate recording is active, a blinking blue light signals Wi-Fi is broadcasting, and a red flash warns of low battery. Some models announce these states through a small speaker near your ear. Memorizing these signals means you’ll never wonder whether your Ski Goggles are actually recording or ready to pair—critical knowledge when you’re about to drop into a run you want captured.
The Core Process: Pairing and Connecting via Wi-Fi
This is where everything comes together. You’ve charged your gear, cleared your storage, and memorized your controls. Now it’s time to establish the wireless bridge between your goggles and your phone—the connection that makes instant footage transfer possible.
Step 3: Activating the Goggles’ Wi-Fi Signal
With your goggles powered on, activate Wi-Fi broadcast mode. On most models, this requires a long press—typically three to five seconds—on the dedicated Wi-Fi button or a specific button combination, such as holding power and record simultaneously. You’ll know it worked when the indicator light shifts to a blinking blue pattern or you hear an audible confirmation tone announcing that the goggles are now broadcasting their own wireless network. Think of your goggles as a miniature router: they’re creating a private, password-protected hotspot that exists solely for your phone to join. This network operates independently of any cellular or resort Wi-Fi, meaning it works perfectly in remote backcountry terrain or crowded base areas alike. Keep the goggles in an open area during initial pairing rather than buried inside a bag, as the signal needs a clear path to reach your phone.
Step 4: Connecting Your Smartphone
Open your phone’s Wi-Fi settings and scan for available networks. You’ll see a unique SSID—something like “SKI_CAM_A7F2” or a brand-specific name that matches what’s printed in your user manual or on a sticker inside the goggle’s battery compartment. Select that network and enter the default password, which manufacturers typically set as something simple like “12345678” or print alongside the SSID information. Once connected, your phone may warn you that this network has no internet access—that’s expected and correct. On iPhones, dismiss any prompts asking you to disconnect; on Android devices, tap “Stay Connected” if asked. Your phone is now communicating directly with the goggles’ internal processor, ready for the companion app to take over.
Step 5: Launching the App for Control & Real-Time Monitoring
Open the manufacturer’s companion app while your phone remains connected to the goggles’ Wi-Fi network. The app should automatically detect the paired device within a few seconds, displaying a confirmation message or jumping straight to the live viewfinder screen. This live preview shows you exactly what the goggle camera sees in real time—an invaluable tool for adjusting your head angle before a run to ensure you’re capturing the trail ahead rather than empty sky or your own ski tips. From this interface, you can tap to start or stop recording, toggle between video and photo modes, adjust resolution settings, and access your media gallery for previously recorded clips. The real-time monitoring feature draws additional battery from both devices, so use it strategically: check your framing once, confirm it looks good, then close the app and rely on physical buttons during your actual descent.
Recording, Transferring, and Managing Your 4K Footage
With your goggles paired and your app connected, you’re ready to put the system to work. The beauty of this setup is that recording, reviewing, and transferring footage becomes a natural rhythm woven into your ski day rather than an interruption to it.
Step 6: Capturing Your Runs with Confidence
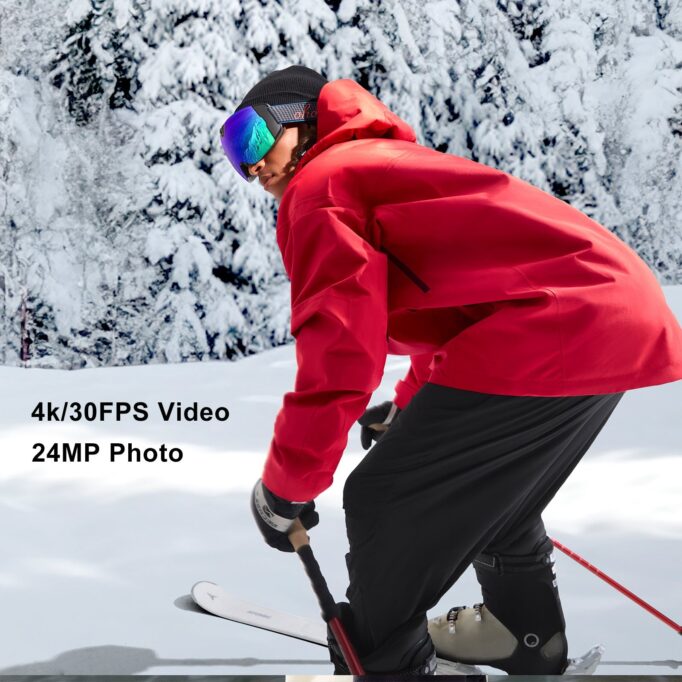
When you’re standing at the top of a run ready to drop in, you have two options for starting your recording. You can tap the record button within the companion app if your phone is handy, or—more practically—press the physical record button on the goggle frame. The tactile click and a brief LED flash or audio chime confirm you’re rolling. For the best footage, keep your head naturally upright and look where you want to go; the camera captures your line of sight, so exaggerated head movements create nauseating playback. A quick tip for battery conservation: rather than recording your entire day continuously, use short bursts for individual runs. A two-minute descent in 4K produces spectacular footage without draining your battery the way a forty-minute continuous recording would. If you want to verify your framing before committing to a full run, open the app’s live preview briefly at the top of the slope, confirm the camera angle captures the trail ahead with a good horizon line, then close the app and ski. The recording continues independently regardless of whether the app is open.
Step 7: Initiating the Wi-Fi Video Transfer
Once you reach the bottom or settle into the chairlift, it’s time to pull your favorite clips to your phone. Activate the goggles’ Wi-Fi if it isn’t already broadcasting, confirm your phone is connected to the goggle network, and open the companion app. Navigate to the media gallery—usually represented by a folder or grid icon within the app interface. You’ll see thumbnails of all recorded clips stored on the goggles’ internal memory or microSD card, organized chronologically with timestamps. Tap on any clip to preview it at lower resolution directly in the app, helping you decide which moments are worth downloading. Select the clips you want, then hit the download or transfer button. The files travel directly from the goggles’ storage to your phone’s local memory over the private Wi-Fi connection—no internet required, no cloud upload delays. Transfer speeds vary by model, but expect roughly one to three minutes per minute of 4K footage. During transfer, keep both devices relatively still and close together. Avoid locking your phone screen, as some systems pause the transfer when the app moves to the background.
Step 8: Post-Transfer: Organization and Next Steps
After the transfer completes, your clips typically land in one of two places: the companion app’s internal media library or your phone’s camera roll, depending on the app’s settings and your operating system. On iOS, you may need to manually save clips from the app to your Photos library; on Android, files often appear directly in your gallery under a brand-specific folder. From here, the mountain becomes your editing studio. Most companion apps include basic trimming tools, allowing you to cut a three-minute clip down to the fifteen-second highlight reel perfect for an Instagram story. You can add filters, adjust playback speed for dramatic slow-motion powder sprays, or stitch multiple clips together. If you have cell service or resort Wi-Fi available at the lodge, share directly to social media while the excitement is fresh. For those who prefer polished edits later, simply leave the files organized on your phone and import them into your preferred editing software at home. Once you’ve confirmed the transfer was successful by playing back the clip on your phone, you can delete the original from your goggles to free up storage for afternoon runs—keeping your system ready for the next epic moment without ever missing a beat.
Troubleshooting Common Wi-Fi Connection Issues
Even with perfect preparation, technology occasionally refuses to cooperate—especially in harsh mountain environments where cold temperatures, competing signals, and gloved fumbling conspire against you. Knowing how to diagnose and fix common problems quickly means you spend more time skiing and less time staring at your phone in frustration.
Problem: Phone Won’t Find the Goggle’s Wi-Fi Network
If your phone’s Wi-Fi scan shows nearby resort networks but nothing from your goggles, start by confirming the goggles are actually in broadcast mode—look for that blinking blue LED or listen for the pairing tone. If you’re unsure, power the goggles off completely, wait ten seconds, then power them back on and re-initiate Wi-Fi mode with the long button press. Crowded base areas with dozens of competing Wi-Fi signals can overwhelm your phone’s ability to detect weaker networks, so try moving to a quieter spot away from the lodge. If the network still doesn’t appear, toggle your phone’s Wi-Fi off and back on to force a fresh scan. On Android devices, clearing the Wi-Fi cache in network settings can resolve stubborn detection failures.
Problem: App Fails to Connect After Wi-Fi is Joined
You’ve joined the goggle network successfully, but the companion app spins endlessly or displays a “device not found” error. Force close the app entirely—swipe it away from your recent apps list—then reopen it. If that fails, check that you’ve granted all required permissions including local network access and location services, which both iOS and Android use for Wi-Fi device communication. Verify you’re running the latest app version, as outdated software frequently loses compatibility after firmware updates on the goggles. When all else fails, reboot both your phone and goggles, then repeat the connection sequence from scratch.
Problem: Slow Transfer Speeds or Dropped Connection
Transfers that crawl or disconnect mid-file are almost always distance or power related. Keep your phone within ten to fifteen feet of your goggles during transfers—stuffing your phone in a deep inner pocket while the goggles sit on a table across the lodge creates enough separation to weaken the signal. Other electronic devices and competing Wi-Fi networks cause interference, so avoid transferring in crowded equipment rooms. Critically, ensure both devices have at least 30% battery remaining; low power causes Wi-Fi modules to throttle performance or shut down unexpectedly. If drops persist, try transferring one clip at a time rather than batch-selecting multiple files, reducing the strain on the connection.
From Slopes to Screen: Mastering Your Wireless Ski Footage Workflow
Mastering the Wi-Fi video transfer process with your 4K camera ski goggles comes down to four fundamental pillars: preparation, pairing, recording with real-time monitoring, and efficient transferring. By charging your devices the night before, familiarizing yourself with physical controls, and clearing phone storage, you eliminate the most common frustrations before they arise. The pairing process itself—activating the goggle’s Wi-Fi broadcast, connecting your phone, and launching the companion app—becomes second nature after just one or two attempts. Once connected, you gain the power to record confidently, preview your framing on the fly, and pull stunning 4K clips to your phone between runs without relying on internet access or cumbersome cables.
This workflow transforms camera ski goggles from a novelty into an indispensable part of your skiing experience. Instead of waiting until you get home to discover whether you captured that perfect moment, you’re reviewing, editing, and sharing highlights while still riding the adrenaline of your last descent. The mountain becomes both your playground and your content studio. So charge up, pair up, and hit the slopes with the confidence that every epic run, every powder spray, and every jaw-dropping vista will make it from your goggles to the world—seamlessly, wirelessly, and without missing a single turn.