Shaky footage remains one of the most persistent challenges facing professional videographers, instantly diminishing the perceived quality of even the most beautifully composed shots. In an industry where smooth, controlled camera movement separates amateur work from professional productions, stability isn’t just desirable—it’s essential. ARRI has long stood as the gold standard in cinematography equipment, and their approach to camera support systems exemplifies this commitment to excellence. Among their most valuable yet often underestimated tools are camera handles, which serve as the critical interface between operator and equipment. This article provides a comprehensive guide to leveraging ARRI side and top handles to dramatically improve your shooting stability. Whether you’re struggling with operator fatigue, seeking better ergonomic grips, or looking to build a more stable camera rig with reliable accessories, understanding how to properly select, configure, and use these handles will transform your handheld work. We’ll explore everything from the fundamental physics of stability to advanced integration techniques with camera cage accessories, ensuring you gain practical knowledge that directly addresses your needs for professional-grade steadiness.
Understanding the Role of Camera Handles in Filmmaking Stability
Camera handles are purposefully designed grip points that attach to your camera system, serving as the primary interface between operator and equipment during handheld shooting. Their fundamental function extends beyond simple convenience—they’re engineered control mechanisms that directly influence the stability and quality of your footage. The physics behind their effectiveness is straightforward: handles create additional leverage points that distribute the camera’s weight across multiple contact areas with your body, reducing micro-movements and tremors that translate into visible shake. They lower the camera’s effective center of gravity and provide mechanical advantage, allowing operators to maintain steadier control with less muscular effort.

Side handles and top handles serve distinctly different purposes in your stability arsenal. A side handle typically mounts to rod systems or cage sides, providing lateral control points ideal for low-angle work, two-handed operation, and weight distribution away from the camera body. Top handles mount above the camera, offering a central carry point, overhead stability, and a platform for mounting accessories like monitors and microphones. This elevated grip naturally stabilizes vertical movements and provides intuitive control during chest-level shooting.
For professional videography, stability isn’t negotiable—it’s the foundation upon which composition, lighting, and performance build their impact. ARRI’s design philosophy recognizes this reality, engineering their handles with precision-machined components, ergonomic contours, and robust mounting systems that eliminate play or flex. Their handles don’t just attach to cameras; they become structural elements that fundamentally enhance rig integrity and operator confidence.
ARRI Side Handles: Your Key to Ergonomic Control and Steady Shots
ARRI side handles represent precision-engineered solutions to the ergonomic challenges of extended handheld shooting. These handles typically feature machined aluminum construction with rubberized or textured grips that conform naturally to hand contours, reducing pressure points during prolonged use. Most ARRI side handles mount via industry-standard 15mm rod systems or directly to cage mounting points through NATO rails or ARRI rosettes, offering flexible positioning options. The adjustable nature of these mounts allows operators to customize grip angles and distances according to their physical build and shooting style, directly addressing individual comfort requirements.

The practical benefits of incorporating a side handle into your rig are substantial. Low-angle shots become significantly more manageable, as the lateral grip point allows you to hold the camera closer to ground level without contorting your body. Weight distribution improves dramatically—rather than concentrating all camera mass through a single top handle or body grip, the side handle creates a secondary support point that spreads load across both arms and shoulders. This redistribution translates directly into reduced operator fatigue, particularly during marathon shooting days. The handle also enables more controlled panning and tilting movements, as the offset grip provides greater rotational leverage than center-mounted options alone.
Step-by-Step: Mounting and Configuring Your ARRI Side Handle
Begin by securing your camera within its cage, ensuring all mounting screws are tightened to manufacturer specifications. Slide your 15mm support rods through the cage’s rod ports, positioning them at the appropriate distance for your side handle’s mounting clamps. Attach the side handle by loosening its clamp mechanisms, sliding it onto the rods at your preferred position—typically offset slightly forward of the camera body for optimal balance—then tightening the clamps firmly. Adjust the handle’s angle by loosening its rosette or rotation lock, positioning it so your wrist remains neutral when gripping, then secure the lock. Test the entire assembly by lifting and maneuvering the rig, checking for any movement or flex at connection points. Make final adjustments to handle position until the rig feels balanced and your grip remains comfortable without muscular tension.
ARRI Top Handles: Enhancing Rigidity and Shooting Versatility
ARRI top handles are engineered as structural centerpieces that anchor your entire camera system, featuring robust aluminum construction with integrated mounting points for accessories and multiple attachment interfaces. These handles typically connect via standardized mounting systems—ARRI rosettes, NATO rails, or direct cage screws—creating a rigid connection that eliminates flex between camera and grip. The elevated position places the handle’s mass directly above the camera’s center of gravity, providing exceptional vertical stability and a natural carry point that keeps equipment secure during transport and repositioning between setups.

The practical advantages of a top handle extend across multiple shooting scenarios. It delivers a solid, intuitive carry point that allows you to confidently move between locations without requiring a full shoulder rig breakdown. The handle’s top surface serves as a stable platform for mounting critical accessories—external monitors maintain steady viewing positions, shotgun microphones achieve optimal pickup angles, and wireless transmitters stay securely attached without adding instability. For chest-level and overhead shooting positions, the top handle provides unmatched control, allowing smooth vertical movements and stable framing that would be nearly impossible with body or side grips alone.
While side handles excel at lateral control and low-angle work, top handles dominate situations requiring vertical stability and accessory integration. The top handle becomes your primary contact point for quick repositioning and run-and-gun scenarios, whereas the side handle serves as your secondary stabilization point during extended handheld takes. Together, they create complementary control axes that address different stability challenges within a single comprehensive system.
Building a Stable Camera Rig: Integrating Handles with Cages and Accessories
ARRI handles function as critical components within a larger ecosystem of interconnected support elements, rather than standalone accessories. The foundation of this system is the camera cage—a protective framework that provides standardized mounting points, rod ports, and threaded holes that create a unified platform for attaching handles, follow focus systems, matte boxes, and monitoring solutions. When properly integrated, handles transform the cage from a simple protective shell into a rigid, operator-friendly control system. The key to successful integration lies in understanding mounting standards: ARRI rosettes provide rotational adjustment with secure locking, NATO rails offer quick-release capability for rapid configuration changes, and 15mm rod systems deliver rock-solid lateral support that eliminates flex during movement.

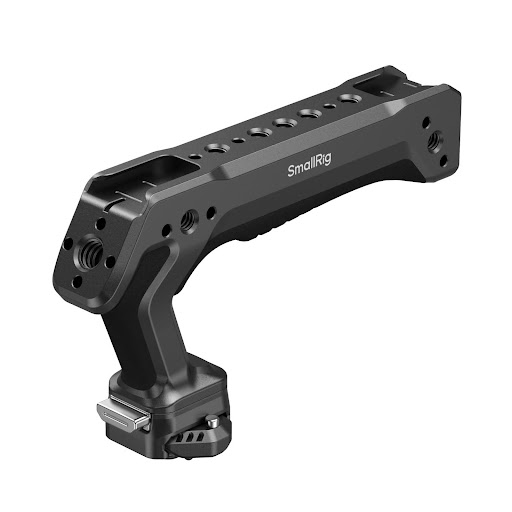
Selecting compatible camera cage accessories requires attention to both mechanical and ergonomic compatibility. Verify that your cage features mounting points that match your handle’s connection system—mismatched standards create weak points that compromise stability. Consider the cumulative weight of your accessory load; handles must support not just the camera but also monitors, wireless systems, and audio equipment without introducing balance issues. Prioritize accessories with secure locking mechanisms rather than friction-only mounts, as vibration during shooting can loosen inadequately secured components. The spacing between mounting points matters significantly—handles positioned too close to the camera body restrict hand placement, while excessive distance creates unwieldy leverage that increases operator fatigue. Many operators also integrate accessories from manufacturers like SmallRig, whose cage systems feature standardized mounting interfaces that ensure compatibility with ARRI handle and other professional components.
Practical Guide: Assembling Your Optimal Handheld Rig
Start by securing your camera firmly within the cage using the baseplate and side supports, ensuring the camera’s center of gravity aligns with the cage’s structural center. Attach the top handle first, mounting it directly to the cage’s top plate via rosette or screw connections—this becomes your primary structural anchor and carry point. Tighten all mounting hardware to specification, then test for flex by applying moderate pressure in multiple directions. Next, install your 15mm support rods through the cage’s front ports, extending them forward approximately 10-15 centimeters beyond the camera body. Mount the side handle to these rods at a position where your forward hand naturally falls when gripping the top handle, typically offset 5-8 centimeters ahead of the camera. Adjust the side handle’s angle until your wrist remains straight during gripping. With both handles secured, lift the rig and assess balance—the system should feel neutral without tipping forward or backward. Add your essential accessories starting with the heaviest items: mount monitors to the top handle’s accessory shoe, position wireless transmitters on cage sides, and attach audio equipment to available mounting points. After each addition, reassess balance and make micro-adjustments to handle positions. Perform a final security check by gently shaking the assembled rig—no component should rattle or shift. The completed system should feel like a unified tool rather than a collection of parts.
Advanced Techniques and Maintenance for Long-Term Stability
Mastering advanced handling techniques unlocks the full potential of your ARRI handle system. For dynamic movements like walk-and-talk sequences, adopt a two-handed grip with your dominant hand on the top handle and support hand on the side handle, keeping elbows tucked close to your body to create a natural shock-absorption system. During transitions between shooting angles, maintain continuous contact with at least one handle to prevent sudden shifts in camera orientation. When executing vertical movements, lead with the top handle while using the side handle as a stabilizing counterpoint, creating smooth arcs rather than jerky lifts. For low-mode shooting, invert your grip on the side handle while supporting the rig’s weight through the top handle, allowing fluid ground-level tracking shots.
Consistent maintenance ensures your handles deliver reliable stability throughout their service life. Inspect all mounting points weekly for signs of wear or loosening—even minimal play at connection points amplifies into visible shake during shooting. Clean rosette teeth and NATO rail channels monthly using compressed air to remove debris that can compromise locking mechanisms. Apply a thin layer of dry lubricant to adjustment mechanisms annually to maintain smooth operation without attracting dust. Check grip surfaces for deterioration; worn rubberized coatings reduce friction and control, necessitating replacement. Verify that all locking screws maintain proper torque specifications, as vibration during transport gradually loosens hardware. Store your rig with handles attached to prevent stress on mounting threads during repeated assembly cycles. This proactive approach to ergonomic grip maintenance preserves the precise tolerances that separate professional-grade stability from amateur inconsistency, protecting your investment while ensuring every shoot benefits from optimal handling performance.
Achieving Professional Stability Through Proper Handle Integration
ARRI side and top handles represent far more than supplementary accessories—they are fundamental tools that directly determine whether your footage achieves professional-grade stability or falls short of industry standards. Throughout this guide, we’ve explored how these precision-engineered components address the core challenges videographers face: eliminating shaky footage through superior ergonomic control, building rigid camera systems through intelligent integration with cages and accessories, and enabling shooting versatility across diverse scenarios from ground-level tracking to overhead perspectives. The side handle delivers lateral control and weight distribution that transforms extended handheld work from an endurance test into a sustainable practice, while the top handle provides the structural anchor and accessory platform that unifies your entire rig into a cohesive operating system. These benefits compound over time—reduced operator fatigue means sharper creative focus, reliable mounting systems prevent costly equipment failures, and consistent stability elevates every project’s production value. Rather than viewing these handles as optional add-ons, recognize them as essential investments in both your craft’s quality and your physical comfort during the demanding work of professional videography. A stable foundation isn’t merely technical—it’s the bedrock upon which creative vision becomes captured reality, shot after shot, project after project.